Felt making can be a wonderful learning through play experience for children of all ages. Art, science, history and geography can all be incorporated. I admit I have never done a children's workshop but I have made felt with my grandchildren. I think one of them was only 2 years old the first time we did it. Here is how to do it.
Materials
The most basic of materials can be used. Bubble wrap, soap, water and fleece are all that is needed. If you have silk fibres, yarn off cuts and glitter it can be even more fun.
Method
Lay the bubble wrap on the table and lay out two layers of woollen fibres with the fibres going in the opposite directions. I have used black and white in the photo so the layers are clear to you.
Then let the children have a field day with colour. They need to cover the base layers with colour. As long as the layers are not too thick they can splodge colours on anyway they like. Older children might like to make a simple picture.
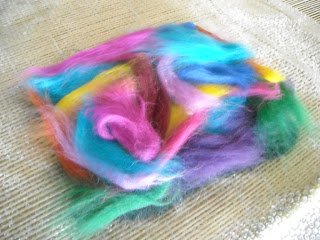
Next the picture can be built up further with the addition of yarns, silk or glitter.
Dribble soapy , warm water over the pile of fibres and fold the bubble wrap over so the fibres are in between two layers. Sprinkle a little soapy water on top of the bubble wrap to make it slippery and rub, in a circular motion all over. Keep rubbing with quite a bit of pressure to entangle all of the fibres together. When you think it is done carefully remove the top layer of bubble wrap and test gently with your finger to see if things still move around or are stuck together. If they have not adhered together continue to rub.

Once the fibres are all firmly tangled together roll the wool and bubble wrap up like a swiss roll. If you have a bamboo mat to roll it up in it will be easier but if not just put a towel on the table underneath the roll. Now roll it backwards and forwards across the table. Unwrap, turn it around and do it again. Do this with all four sides in turn. It should begin to feel firm now and more stable.
Next you need to rinse out the bubbles and squeeze out the excess water. Use cold water for this bit as it helps to harden the felt. To finish screw the felt up in to a ball and repeatedly throw on to the table ( the boys like this bit best). When the felt begins to wrinkle up slightly it is done!
Just flatten it out and leave to dry.
At this stage I was going to show you a photograph of my finished piece but I am afraid the puppy got hold of it when it was drying, dragged it around the garden a few times and chewed it up. He is the innocent looking brown one but his friend was happy to play tug of war with it too.

 Next the picture can be built up further with the addition of yarns, silk or glitter.


 Once the fibres are all firmly tangled together roll the wool and bubble wrap up like a swiss roll. If you have a bamboo mat to roll it up in it will be easier but if not just put a towel on the table underneath the roll. Now roll it backwards and forwards across the table. Unwrap, turn it around and do it again. Do this with all four sides in turn. It should begin to feel firm now and more stable.
